Lap shear. The lap shear joint is that used almost universally in testing adhesives or surface preparation techniques. It owes its popularity to its convenience of manufacture and test, as well as to the fact that the adhesive is subjected to cleavage as well as to shear. It thus simulates, in a way that torsional shear test does not, the actual use of an adhesive. Its deficiency lies in the fact that the particular ratio of normal to shear stresses is likely to be very different from those situations in which it will be used, and which the test is intended to simulate. Thus, depending on such factors as adherend stiffness, overlap length, adhesive modulus, etc., failure of the ‘shear’ joint can be dominated by either shear or tension. Some results comparing the effect of different joint geometries (see Fig. 4.7) on the apparent shear strength of two cold-cure expoxies are collected in Table 4.4. Clearly, for joints constructed with thin adherends and/or long overlap lengths it makes more sense to quote joint failure loads and to describe the joint geometry, rather than to quote the average shear stress at failure.
The traditional view of lap joint failure is old and familiar and was, in essence, employed by Fairbairn(36) who considered the failure mode of riveted joints on iron bridges. However, the topic of bonded lap shear joints is probably best reviewed in detail by
![]()
|
|
|
|
|
|
|
|
|
|
|
|
|
|
|
|
|
|
|

![]()


|
Description/ standard |
Overlap |
Adherend thickness (mm) |
Average shear stress at failure (MN m~2) |
||
|
Joint type |
length (mm) |
Adhesive A |
Adhesive В |
||
|
Single lap |
BS 5350:C5:1976 |
12.5 |
1.5 |
____ |
_ |
|
ASTM D1002:1972 |
12.7 |
1.6 |
14-16 |
14-15 |
|
|
(Fig. 4.7(a)) |
5.0 |
1.6 |
24-31 |
19-22 |
|
|
Double lap |
BS 5350:C5:1976 |
12.5 |
1.5 |
— |
— |
|
‘tuning fork’ |
ASTM D3528:1976 (Fig. 4.7(e)) |
12.6 |
3.2/1.6 |
15-17 |
18 |
|
Cyl butt joint in shear |
(Fig. 4.7(A)) |
25.4 dia |
26 |
19 |
|
|
Doublelap |
Ref. 87 (& Fig. 4.7(fl) |
40 eff |
5.0 |
10-12(A) |
18-21(C) |
|
Single lap |
12.7 |
6.35 |
28(A) |
27(C) |
|
|
thick |
Similar to |
10.0 |
6.35 |
33(A) |
28(C) |
|
adherend |
DIN54451:1977 |
8.0 |
6.35 |
33(A) |
27(C) |
|
shear test |
(Fig. 4.7(d)) |
8.0 |
6.35 |
40*(C) |
27*(C) |
|
(TAST) |
5.0 |
6.35 |
33(A) |
26(C) |
|
|
All-adhesive beam in shear box |
Ref. 87 (& Fig. 2.15) |
25-30 |
15-30 |
|
Notes: Gritblasted steel adherends (* indicates silane-primed) Joints cured and tested at about 20 °С Bondline thicknesses of the order of 0.65 mm Lap joint tests conducted to yield a rate of shear strain of about 1.0/minute, except for Ref. 87 double lap specimen A adhesive failure C cohesive failure Adhesive A = aromatic amine-cured epoxy Adhesive В = aliphatic amine-cured expoxy |
Wake(37) and by Adams and Wake(5), and Kinloch(4) summarises the evolution of the approach of the many stress analysts. The most common shear test comprises the single lap shear joint embodied in BS 5350(10) and ASTM D1002-72(ll) (Fig. 4.7(a)). With reference to Figs. 4.1(a) and 4.8 it can be seen that the resulting stress concentrations can be extremely large at the joint ends (points X and Y in Fig. 4.8(h)). The analysis of Volkersen(15) predicts that for identical adherends, the elastic shear stress concentration factor, и, for the adhesive due to adherend tensile strain is given by
n = = (Д/2)4 coth (Д/2)4 (4.6)
Tav
GJ2
where Д = , the symbols being defined in Fig. 4.8.
Thus decreasing the overlap length or shear modulus of the adhesive, or increasing the adherend stiffness or adhesive layer thickness, will decrease the shear stress concentration in the adhesive layer.
The situation examined by Volkersen is incomplete in that no account is taken of the tearing stress set up in the adhesive as a result of the eccentricity of loading of the lap joint. The loads in the single lap are not colinear so that a bending moment must exist, and the joint will rotate as shown in Fig. 4.9. Goland and Reissner(16) took this effect into account in their analysis by using a bending moment factor, k, to account for cylindrical bending of
|
I. h——— і |
1 |
|
h ( E 1 1 1 1 1 1 П і C 4 ! 1 1 1 |
|
|
f vT.> 111 І і |
|
|
1 A___ ! 1 L L l-_- 1 |
LfJ t |
|
(a) |
(b)
Fig. 4.8. Shear in adhesive due to extensibility of adherends. (a) Unloaded. {b) Loaded in tension (elastic substrates).
![]()
 |
||
Bending moment, M =
h = adherend thickness
Fig. 4.9. Joint in bending (Ref. 5). (a) Undeformed joint. (b) Deformed joint.
the overlap region. Alignment tabs are sometimes attached to the ends of the joint to give a ‘straight pull’ during testing, but the joint will still rotate. Thus joints employing thin adherends or adherends in which the stress level is high will always bend so that the adhesive shear stress is non-uniform and large transverse peel stresses will exist. Average shear stress therefore bears little relationship to what is actually happening in such joints, and Lutz(38) describes some further effects of test specimen geometry on ‘shear strength’ results.
Attempts to improve on the single-lap test have led to a proliferation of alternative configurations (Fig. 4.7). The ‘thick adherend’ test (Figs. 4.7(b) and (d)) minimises the effect of differential straining by using stiff thick adherends and, with suitable extensometry, may be used to determine adhesive stress-strain response(39-43). The symmetry of the double lap joint (Fig. 4.7(e)) has led to the popular belief that bending is eliminated, but in fact it is really no more than a back-to-back arrangement of two single lap joints. Whilst there is no gross joint rotation under load, the internal joint loads are not colinear so that differential adherend straining and transverse stresses still exist. The double butt-strap joint shown in Fig. 4.7(f) suffers also from the same limitations.
Real bonded joints are unavoidably formed with a fillet of adhesive spew at the overlap ends (Fig. 4.10(a)). Even if this is removed, some slight amount of adhesive still remains and truly sharp corners are not encountered. It is in these regions of maximum stress, where failure is initiated, that most analyses are remote from reality, and here Adams and co-workers at Bristol University have been amongst the main investigators, using finite-element techniques(5). Indeed the adherend corner is likely to be rounded rather than truly square, which actually has the effect of reducing stress concentrations in the adhesive layer. Joint failure begins in these spew fillets of adhesive
Probable failure path
![]()

 which, although not transmitting much stress, are subjected to large strains if adherend deformation is significant (Fig. 4.10(h)). Thus lap joint failure may be initiated by high tensile stresses within the spew.
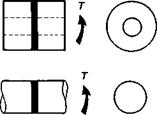
Torsional shear. Torsional shear testing(5, 43-45) gives the best estimate of fundamental shear strength. By applying equal and opposite torques, T, to ‘napkin ring’ or annular butt-joint specimens (Fig. 4.7(g) and (h)), the adhesive is stressed purely in shear and the maximum stress, ттах, will be that at the outside radius. However, it should be noted that the presence of a spew fillet of adhesive around the joint leads to a significant stress concentration at the adherend/adhesive interface. Bryant and Dukes(46) found that there was a linear relationship between decreasing bondline thickness and increasing failure stress. Curiously, this observation of the critical effect of adhesive layer thickness is not mentioned by any other investigator except Stringer(47). Lin and Bell(48) described the test in some detail, with an optimised specimen geometry and method of deformation measurement. Renton(32) reviewed the work of a number of investigators with the object of determining accurate shear stress-strain representations of the adhesive layer response. Stringer describes adhesive material characterisation using 15 mm diameter solid aluminium butt-joints. He found that the strain to failure of many adhesives was greatly increased by reducing the bondline thickness to below, say, 0.2 mm. A very large adherend deformation was subtracted from the total ‘twist’, and bondline thickness measurements needed to be determined very accurately for calculating material properties. ASTM E 229-70(49) describes a method of testing and evaluating the shear modulus and shear strength of adhesives by the napkin- ring test.
Scarf shear. It was stated earlier that scarf joint specimens are the most efficient way of smoothing the transfer of stress and strain across a joint. The scarf joint (Fig. 4.7(/’)) is advocated for the measurement of ‘bond strength’ to concrete substrates by BS 6319(50); the Standard recommends that the average shear stress on the bondline at failure be recorded. A concrete prism is loaded in compression, and the bondline is subjected to a mixture of shear and compression, the relative proportions of which depend upon the scarf angle, ф. BS 6319 recommends 30° (giving a shear to compression ratio of 1.732 : 1) although other investigators have used 45° (giving a ratio of 1 : 1). Eyre and Domone(51) conducted a series of tests in which the scarf angle was varied, and the results were plotted on a Mohr’s circle of stress, from which the average shear stress at failure for ф = 0° could be extrapolated for different adhesives. Again, this value is not an intrinsic adhesive material property, and the results are very dependent upon such factors as the concrete surface rugosity along the scarf. Further, it is quite common for the concrete to fracture away from the bondline. As a shear test it must be disqualified, and as test of ‘bond strength’ or adhesion it must also be discounted.
 30 июля, 2015
  Malyar
  Опубликовано в рубрике