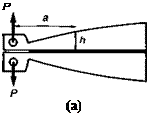
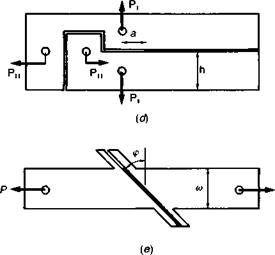
A major feature of the fracture mechanics argument is that the fracture energy, Gc, for a given joint, tested at a stated rate and temperature, is independent of the test geometry employed. In principle therefore, and with appropriate modifications, almost any test configuration could be used. In practice, certain geometries lend themselves particularly to analysis and experimental convenience, and are depicted in Fig. 4.14.
Mode I is the lowest energy fracture mode for isotropic materials and, thus, a crack always propagates along a path normal to the direction of maximum principal stresses. In joint fracture this is not necessarily the case since crack propagation is constrained to the adhesive layer, and mixed-mode effects may be important. Thus, attention must be given to joint fracture under additional loading modes for structural design purposes(28). Evidence in the literature suggests that the fracture energy of ‘toughened’ adhesives, when constrained as a layer in a joint, may be particularly sensitive to mixed-mode effects. Adhesive layer thickness may also have a profound effect because of its influence on the development of the plastic zone (Fig. 4.5). Bascom et al.{26) suggest that the size of this zone is very much larger than that associated with untoughened adhesives. Specimen width effects may also affect measured values because the state of stress varies from plane-stress in a very thin specimen to plane-strain near the centre of a wide plate. By conducting tests at a number of load rates and/or temperatures, time-temperature superposition principles may be employed to characterise fracture fully(25) in terms of both fracture energy, Gc, and fracture toughness, Kc.
Tapered double cantilever beam (TDCB). The TDCB, or more accurately the contoured DCB, specimen as developed by Mostovoy
 |
|
|
|
|

|
P* dC 2b da |
and Ripling, is used frequently for ascertaining Mode I values (Fig. 4.14(a)). Provided that the arms of the specimen behave elastically, then the general expression for fracture energy is given by
where P is the applied load, b is the specimen width, and dC/da is the change in the compliance, C, of the structure with crack length, a. The explicit form of this equation for a TDCB specimen is given as
![]() API
API
b2E
where the constant
h is the height of the beam at the respective crack length a, and m is often taken to be about 3.5 mm-1. By tapering the substrates, a constant change in compliance with crack length is obtained, so that for a given applied load the value of Gic is independent of crack length. This is particularly useful in experimental work since the location of the crack tip can be difficult to define accurately. A variant of this specimen design is one where the width of a parallel- double-cantilever-beam is increased down its length so that the specimen’s compliance is again constant.
Load-displacement curves take the two major forms shown in Fig. 4.15. If the fracture energy is independent of the crack velocity, brittle crack propagation will occur at a constant load with the rate of propagation being dependent upon the strain rate (Fig. 4.15(a)); this is termed ‘stable’ crack growth. Alternatively, brittle crack propagation may occur intermittently in a stick-slip or ‘unstable’ manner (Fig. 4.15(h)), exhibiting load values appropriate to both crack initiation and crack arrest. This occurs when a crack, once initiated, extends spontaneously until the strain energy in the specimen is insufficient to continue propagation.
Major limitations of this test include the initial requirement for a numerically controlled milling machine to achieve the cubically curved specimen shape (for constant ‘m’), the configuration is not
self-stressed, and bondline thickness is likely to affect the energy of fracture (especially with toughened adhesives).
Double cantilever beam (DCB). The ‘thick’ DCB specimen (Fig. 4.14(b)) is very popular in the aerospace industries for ascertaining Mode I values. The substrates are simple thick beams and inexpensive to produce. Joints can be loaded in a test machine, ‘statically’ or in fatigue, or else used as self-contained environmental exposure specimens when fitted with wedge-opening bolts(57-63). The specimen compliance, dC/da, is not constant so that under constant load conditions, Gi decreases as the crack length increases. This feature allows the establishment of ‘threshold’ levels as a function of environmental conditioning. Fracture energy is given by
![]()

EcPh3 [3(a + 0.6b)2 +h2] 16 [(a + 0.6b)3 +ah2]2
where: h = beam thickness; d = displacement at load point; a = crack length, from load point to crack tip; E = adherend modulus. The h2 and ah2 terms derive from the shear contribution to adherend elastic energy. The 0.6 h term is an empirical average correction for adherend rotation ahead of the crack tip, permitted by ductile strain or crazing of the adhesive(58, 63). The proper correction, unique to each adhesive, varies with the mechanical response to the environment. Crack lengths and locations (i. e. cohesive, interfacial, etc.) are monitored as a function of time of exposure with a travelling microscope, but this can be rather time — consuming.
The location of the true crack-tip is sometimes difficult to determine, even after careful filing of the specimen edges to remove adhesive spew. This can be particularly problematical if the adhesive is of coarse texture, when the crack is at the interface, or if significant adherend corrosion takes place during environmental exposure. Both sides of the specimen need to be monitored, and the average value taken. (In fact, crack propagation along the specimen sides tends to lag behind the advancing crack front in the centre of the specimen).
The behaviour of specimens constructed with either soft or stiff adhesives may be quite different(64). For instance, for the same value of ‘<f and V in each specimen, GiC will be the same but the stiffer adhesive will be resisting a higher tensile stress. Clearly, creep effects with ductile adhesives will redistribute stress concentrations. There may also be a rate-dependent effect on G|C (initial) when displacing the adherends with bolts.
Wedge cleavage test. A DCB derivative test developed by the Boeing Commercial Airplane Company is the wedge test or Boeing wedge test, standardised for aluminium adherends in ASTM D3762(65). The test specimen, depicted in Figure 4.14(c), may be regarded as a simplified, qualitative, and less expensive version of the DCB specimen. According to Marceau et al. (58) it was developed specifically to provide a simple specimen for adherend surface pretreatment process control for airframe construction. The method simulates in a qualitative manner the forces and effects on an adhesive bonded joint at the adherend/adhesive (primer) interface, and has proved to be correlatable with aircraft service performance. Essentially, a wedge is forced into the bondline and the stressed specimen is exposed to an aqueous environment. The resulting crack growth rate is monitored by travelling microscope and the locus of failure noted, i. e. cohesive, interfacial, etc. This test is probably the single most important tool used in the aircraft industry for monitoring and assessing adherend surface pretreatment.
The success of the test in discriminating between variations in adherend surface preparation and adhesive environmental durability has led to its widespread use in an R&D role(60, 66-69). In general, the test results are viewed only as qualitative because the fracture energies of many adhesives are high enough to cause inelastic deformation of the adherends. Thus crack lengths, rather than
calculated fracture energies, are generally quoted. Nevertheless, Stone and Peet(63) demonstrated that an approximation to GIC was a more useful basis for comparison than crack growth; indeed they conducted a very useful evaluation of the validity and limitations of the wedge test. If steel adherends are substituted for aluminium, adherend deformation should remain elastic for all but the toughest adhesives, and valid fracture energies may be ascertained from Eqn (4.10). The cleavage stresses induced at the crack tip are somewhat higher than in the stiffer DCB specimen because of the greater adherend deformation, and the test is likely to be more demanding of the interface. This greater deformation also facilitates location of the crack tip. Major limitations of the test are as for the DCB specimens.
Independently loaded mixed-mode specimen (ILMMS). This specimen is illustrated in Fig. 4.14(d) and, as the name suggests, shear and tensile loads are applied independently. The overall joint dimensions suggested by Bascom et al. (26, 27) of 300 x 100 x 12 mm, imply oversize specimens; equations for the two fracture modes are
![]() GiC = (4Pjlb2h3E) • [3(a + 0.6A)2 + h2] Cue = [Phlb2h E]
GiC = (4Pjlb2h3E) • [3(a + 0.6A)2 + h2] Cue = [Phlb2h E]
The use of this specimen configuration is rarely reported, and some major limitations are that the large adherends require significant machining and are unlikely to be flat, the joint does not lend itself to stressed (durability) testing, the specimen width precludes rapid environmental ingress, and the monitoring of crack elongation in Mode I loading would be awkward.
Scarf joint. The importance of testing adhesive fracture under mixed-mode stress conditions has been noted. In the scarf joint (Fig. 4.14(e)), the applied load is resolved in the bondline to Mode I and Mode II components and their ratio changes with the scarf angle, ф. Bascom et al.(26, 70) investigated the effects of bondline thickness and test temperature, and n)C for ф = 45° was calculated from the failure load and crack length using a finite — element analysis. A complex behaviour pattern emerged, as discussed
by the authors(26), and by Anderson et al. (25). It is very significant that the fracture energy of some toughened and some modified epoxies measured in combined shear and cleavage loading was lower than the corresponding Mode I fracture energy by as much as a factor of ten. Such vast differences were attributed to the effect of stress distribution on the morphology and micromechanics of failure. It should be noted that rubber modified products derive their toughness from a shear-yielding mechanism, so that mixed-mode loading may well interfere with this energy dissipative mechanism. Bascom and Hunston(27) concluded that in designing for flaw tolerance, Mode I fracture toughness is by no means a conservative estimate of fracture resistance — and may even be an unsafe assumption. Users of toughened adhesives beware!
This specimen configuration has the potential for highlighting some intriguing observations, but amongst its limitations must be that it is a massive specimen of complex shape requiring significant machining, it does not lend itself to stressed (durability) testing, and the bond area is too large to permit environmental access within a reasonable time-scale. Further, crack propagation will be focussed mechanically towards the interface in mixed-mode loading, involving surface roughness effects. Also, the scarf angle, bondline thickness, the nature of the adhesive, and the loading rate are all likely to affect the measured fracture energies.
 2 августа, 2015
  Malyar
 Опубликовано в рубрике