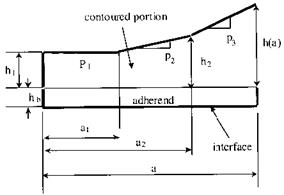
 On the basis of the compliance derived from the Rayleigh-Ritz solution, a methodology for the design of the contour of a CDCB specimen was proposed [8]. A graphical representation of the geometric parameters used in defining the CDCB specimen is shown in Fig. 7, where the constant height of the base adherend is hb, and the bonded contoured portion of the CDCB specimen is assumed to have an initial constant height h1 for an initial crack length a1. This initial constant height should provide sufficient material to accommodate loading fixtures, such as an attached hinge or a pin through the specimen. The expression for dC/da is obtained by assuming a linear shape of the contour for each
|
Figure 7 Geometric parameters of the contour of the CDCB specimen. |
discrete crack length (a > a{). The following step-by-step procedures are used to design the contoured specimen:
(1) Compute the compliance of the CDCB specimen by the Rayleigh-Ritz method
[8] as a function of crack length and specimen-slope: C = C(a, p).
(2) Differentiate the compliance function to obtain dC/da.
(3) Evaluate dC/da for a discrete value of a, say a = a2 for a2 > a1 (Fig. 7).
(4) Equate dC/da, evaluated at a discrete crack-length, to a predefined constant value K to solve for the specimen-slope, say p = p2. That is, let (dC/da)(a2,p2) = K and solve for p2.
(5) Then, h(a) = h1 + p2(a—a1) for a>a1, say h2 = h1 + p2 (a2 — a1).
(6) Repeat steps 1 through 5 to solve for p3.
This procedure is repeated for each incremental crack length until the contour for the entire length of the CDCB specimen is obtained. When an interface of dissimilar materials is considered, the contour has to be developed for each adherend, since the stiffness of the adherends would be different and the shape of the contour would be different on the two sides of the interface bond in order to achieve the same rate of compliance for each half of the specimen.
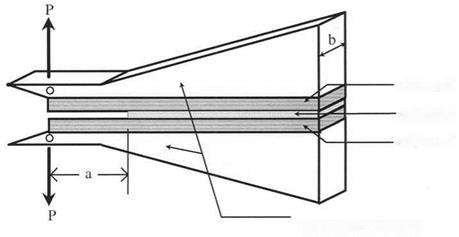
The exact contour obtained from the above procedure has a convex shape [8], obtained by fitting a polynomial function through the discretized heights. However, the effort and cost involved in accurately manufacturing such a complex geometry can be significant, particularly since it is often necessary to test several specimens to obtain a good estimate of the fracture toughness of the interface. The exact contour can be simplified by a linear approximation function obtained through regression of the discrete heights [8]. Then, through experimental and analytical investigations of the compliance rate change [12,13], the linearity of the compliance-crack length relationship of a linear-slope CDCB specimen, or so-called tapered double cantilever beam (TDCB) specimen, can be verified for specific ranges of crack lengths, and the constant compliance rate change (dC/da) can be used in Eq. (1) for fracture toughness evaluation [14].
 15 июля, 2015
  Malyar
 Опубликовано в рубрике