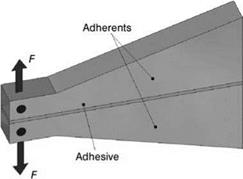
Determination of the fracture resistance of structural adhesive joints is typically tested under an applied Mode I opening load, using double cantilever beam (DCB) and tapered double cantilever beam (TDCB) specimens.
The resistance to crack initiation can be determined from both a nonadhesive insert placed in the adhesive layer and from a mode I precrack. The resistance to crack propagation is then determined from the mode I precrack. The adhesive fracture energy GIC (also termed the critical strain energy release rate) for applied Mode I loading can be calculated and a resistance (R)-curve — that is, a plot of the value of the adhesive fracture energy GIC versus crack length — can be deduced [3]. The TDCB shown in Figure 7.7 is designed so that, over a large range of values of crack length, the rate of change of compliance with crack length is constant and thus independent of the value of crack length. This is useful as it means that: (i) relatively tough adhesives may be tested without plastic deformation of the arms occurring; (ii) the substrates may possess a relatively low yield stress, but again no plastic deformation of the arms may be incurred during the test; and (iii) the measurement of GIC is independent of the crack length, a. To develop a linear change of compliance with crack length, the height of the specimen is varied by contouring the substrate beam so that the quantity:
is a constant, where m is the specimen geometry factor.
7.2.5
Wedge Test
 |
The so-called ‘wedge test’ according to D 3762, for example, simulates — in qualitative manner — the forces and effects on an adhesive bonded joint at the metal-adhesive/
|
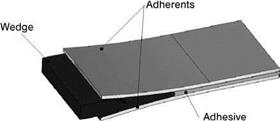
Figure 7.8 The basic geometry of a wedge test specimen. |
primer interface. This test has proven to be highly reliable for determining and predicting the environmental durability of adherent surface preparations. The results obtained may be well correlated to the service performance of the adhesive in a way that is much more reliable than conventional lap shear or peel tests.
At the beginning of the test a wedge is driven into the bond-line of a flat-bonded specimen, thereby creating a tensile stress in the region of the resulting crack tip (Figure 7.8). The stressed specimen is exposed to an aqueous environment, usually at an elevated temperature, or to an appropriate environment relative to the use of the bonded structure in the later application. The resulting crack growth with time and failure modes are evaluated later. Variations in the adherent surface quality are easily observable when the specimens are forcibly, if necessary, opened at the end of the test.
 17 октября, 2015
  Pokraskin
 Опубликовано в рубрике